
If you have a soft spot for fluffy, sweet treats but follow a plant-based lifestyle, this Vegan Marshmallow Recipe is a total game-changer. Imagine sinking your teeth into clouds of pillowy, melt-in-your-mouth marshmallows that are completely free of gelatin and animal products, yet still boast that classic texture and sweetness we all adore. This recipe uses clever natural ingredients like pea protein and agar powder to create marshmallows that loft perfectly and taste absolutely divine. Whether you’re roasting them over a campfire or chopping them up for your favorite desserts, these vegan marshmallows will become your new go-to treat in no time.
Ingredients You'll Need
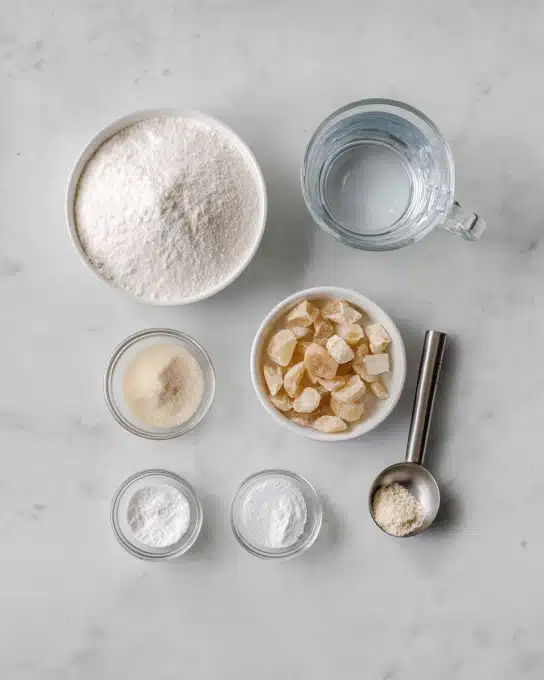
The magic behind these marshmallows lies in a handful of simple but powerful ingredients. Each one plays a vital role in building the perfect texture, stability, and that just-right sweetness we crave in a marshmallow.
- Tapioca flour (2 Tablespoons): Acts as part of the coating to keep marshmallows from sticking, adding a subtle chewiness on the outside.
- Powdered sugar (2 Tablespoons): Works with tapioca flour for that classic marshmallow dusting and a touch of extra sweetness.
- Pea protein powder (5 Tablespoons): The superstar plant protein that helps create fluffy peaks and structure, replacing gelatin perfectly.
- Baking powder (2 teaspoons): Provides lightness and helps the marshmallows rise.
- Xanthan gum (¼ teaspoon): Adds elasticity, giving the marshmallows that satisfying bounce.
- Cold water (¾ cup): Hydrates the powders for smooth mixing and whipping.
- Sugar (2 cups): The primary sweetener that caramelizes slightly for depth and the iconic marshmallow flavor.
- Agar powder (1 Tablespoon): A seaweed-based gelling agent that firms up the marshmallows, taking the place of gelatin.
- Water (1 cup): Used to dissolve the agar and sugar for the perfect syrup base.
How to Make Vegan Marshmallow Recipe
Step 1: Prepare the Pan and Coating
Start by mixing the powdered sugar and tapioca flour in a small bowl. This combo will be your marshmallow’s outer protective dusting to prevent stickiness. Spray an 8x8 pan lightly with non-stick spray, then generously coat it with the sugar-flour mixture, shaking off any excess back into the bowl so you have plenty for later. This step ensures your marshmallows release cleanly and have that nostalgic powdered finish.
Step 2: Whip the Pea Protein Mixture
Next, add the pea protein powder, baking powder, and xanthan gum into your stand mixer bowl, then pour in the cold water. Using the whisk attachment, beat this blend on high for about 10 minutes. You'll notice it thicken dramatically and form stiff peaks—this foamy base is the plant-powered foundation for your marshmallows’ signature fluffy texture.
Step 3: Cook the Sugar and Agar Syrup
Meanwhile, combine the sugar, agar powder, and water in a heavy-bottomed pot. Stir and bring the mixture to a boil over high heat, then keep stirring occasionally until it reaches a precise temperature of 225-227°F. This step is essential because it ensures the syrup is cooked enough to set properly but not overcooked, which would affect taste and texture.
Step 4: Combine Hot Syrup with Pea Protein Foam
Once your syrup hits the right temperature, carefully pour it in swiftly into the mixing bowl above while running the whisk on high speed. This is a bit of a splashy process, so a splatter shield or a clean kitchen towel is a good idea here! Whisking the syrup into the protein foam not only heats the mixture slightly but also activates the gelling agents, helping the marshmallow set beautifully.
Step 5: Whip Until Fluffy
Continue mixing the combined ingredients on high speed for another 10 minutes, taking care to scrape the sides and bottom with a rubber spatula halfway through. By the end, your mixture will transform into a glossy, thick cloud that holds firm stiff peaks. This is exactly the texture you want for perfect marshmallows.
Step 6: Set the Marshmallow Mixture
Quickly pour your fluffy mixture into the prepared pan and use a butter knife or offset spatula to spread it smoothly to the edges and corners. Speed is your friend because this mixture starts setting rapidly. Pop the pan into the refrigerator for about an hour, giving it time to fully set and become sliceable.
Step 7: Cut and Coat
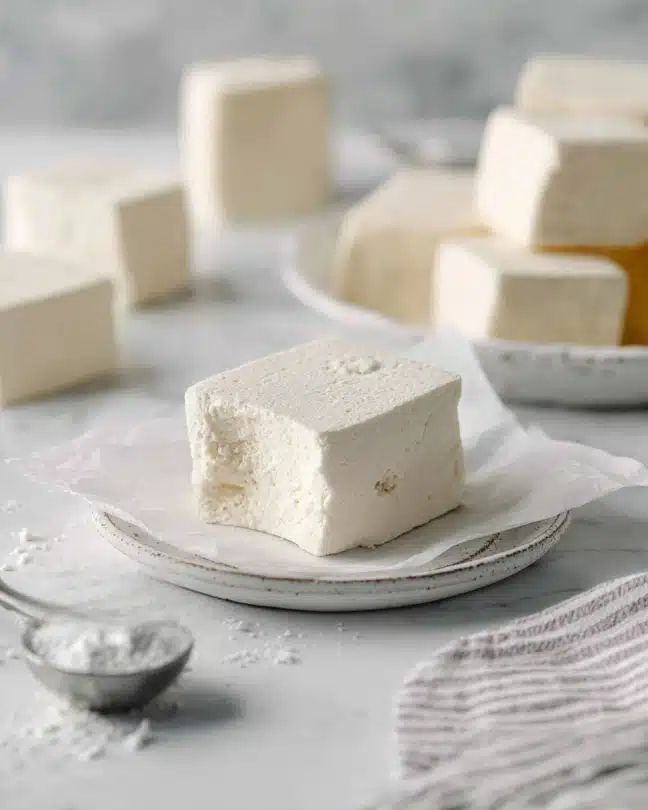
Once firm, invert the marshmallow slab onto a cutting board dusted with your reserved powdered sugar and tapioca mixture. Cut the marshmallow into squares of your preferred size, then toss or lightly coat each piece with the coating mix. This final dusting ensures they won’t stick together and gives them their classic finish. Your homemade vegan marshmallows are now ready to enjoy!
How to Serve Vegan Marshmallow Recipe
Garnishes
For an extra touch of flavor and fun, try rolling your marshmallows in finely chopped toasted coconut, crushed nuts, or even a sprinkle of cinnamon mixed into the coating. These little twists add delightful texture and flavor contrasts that elevate your vegan marshmallow experience to a whole new level.
Side Dishes
Vegan marshmallows are fabulous paired with warm drinks like hot cocoa made from plant milk or a spicy chai latte. They also complement vegan brownies and chocolate chip cookies beautifully, making them a perfect addition to any dessert platter. You might even toss a few into a bowl of vegan baked apples for a gooey, cozy treat.
Creative Ways to Present
Get playful by threading vegan marshmallows on skewers and roasting them over a safe flame, just like traditional marshmallows. Another fun idea is layering cut marshmallows in parfait glasses with fruits and dairy-free whipped cream for a stunning layered dessert. Or, chop them up to sprinkle over vegan ice cream sundaes for a sweet, fluffy crunch that surprises and delights.
Make Ahead and Storage
Storing Leftovers
Your vegan marshmallows will keep well in an airtight container at room temperature for up to a week. Make sure to keep them dusted with the powdered sugar-tapioca mix to avoid stickiness, and separate layers with parchment paper if stacking.
Freezing
If you want to store them longer, you can freeze the marshmallows in a freezer-safe container or zip-top bag. When you’re ready to enjoy them, just thaw at room temperature— they’ll retain their softness and flavor perfectly after freezing.
Reheating
Usually, there’s no need to reheat vegan marshmallows, but if you want to soften slightly hardened edges, pop them in the microwave for about 5-7 seconds. Just watch closely so they don’t melt into a gooey mess unless that’s the texture you’re aiming for in s’mores or hot drinks.
FAQs
Can I use other protein powders instead of pea protein?
Pea protein is ideal here due to its neutral taste and texture, but you might experiment with other unflavored plant protein isolates like rice or soy powders. Just be aware that results may vary in flavor and fluffiness.
Is agar powder the same as agar flakes?
No, agar powder and agar flakes have different gelling strengths and textures. This Vegan Marshmallow Recipe specifically calls for agar powder to achieve the right firmness and consistency.
Can I make the vegan marshmallows without a stand mixer?
While a stand mixer speeds up the whipping process and achieves better peaks, you can use a hand mixer or even whisk by hand if you’re prepared for a good arm workout! The key is to whip until you get those glossy stiff peaks.
What can I use instead of tapioca flour for coating?
If you don’t have tapioca flour, cornstarch works as a great alternative for the marshmallow coating, preventing stickiness and giving the traditional matte finish.
How long do vegan marshmallows keep their texture?
Properly stored, these marshmallows maintain their soft, fluffy texture for about a week at room temperature. Over time they might dry out a bit, but are still tasty for roasting or melting.
Final Thoughts
Making your own vegan marshmallows is such a rewarding and fun kitchen adventure, especially when you get to indulge in a fluffy, sweet treat that aligns with your lifestyle. This Vegan Marshmallow Recipe is full of heart and simple ingredients that combine to create pure bliss in every bite. I can’t wait for you to try it and share these cloud-like delights with your favorite people—get ready to elevate your vegan dessert game with ease and joy!
Print
Vegan Marshmallow Recipe
- Prep Time: 25 minutes
- Cook Time: 10 minutes
- Total Time: 1 hour 25 minutes
- Yield: 20 servings
- Category: Dessert
- Method: Stovetop
- Cuisine: Vegan
- Diet: Vegan
Description
This Vegan Marshmallow recipe creates fluffy, sweet, and allergen-friendly marshmallows without using gelatin or egg whites. Using pea protein, agar powder, and a blend of natural thickeners, these marshmallows offer a perfect vegan substitute that holds together well and has the classic texture and sweetness. Ideal for snacks, desserts, or holiday treats, this recipe yields about 20 squares and requires an hour and 25 minutes to prepare and set.
Ingredients
Coating Mixture
- 2 Tablespoons tapioca flour (or corn starch)
- 2 Tablespoons powdered sugar
Marshmallow Base
- 5 Tablespoons pea protein powder (with at least 90% protein isolate)
- 2 teaspoons baking powder
- ¼ teaspoon xanthan gum
- ¾ cup cold water
Syrup Mixture
- 2 cups sugar
- 1 Tablespoon agar powder (not the flakes)
- 1 cup water
Instructions
- Prepare Coating Mixture: In a small bowl, combine the powdered sugar and tapioca flour (or corn starch). Spray an 8x8 inch pan with non-stick spray, then evenly coat the pan with the powdered sugar mixture. Tap out any excess and set the leftover mixture aside for later use in coating the marshmallows.
- Mix Pea Protein Base: In the bowl of a stand mixer fitted with a whisk attachment, combine the pea protein powder, baking powder, and xanthan gum. Add the cold water and whisk on high speed for 10 minutes until the mixture becomes thick and holds stiff peaks.
- Prepare Agar Syrup: In a large, heavy-bottomed pot, combine the sugar and agar powder. Add 1 cup of water, stir to combine, and heat over high heat. Stir occasionally and use a candy thermometer to monitor the temperature until the mixture reaches 225-227°F (about 107-108°C).
- Combine Syrup and Pea Protein Mixture: Immediately after the syrup reaches temperature, carefully and quickly pour it into the pea protein mixture while whisking on high speed. To avoid splatter from the hot syrup, cover with a splatter shield or a clean towel as needed.
- Whisk to Fluffy Consistency: Continue whisking on high speed for another 10 minutes, scraping down the sides and bottom of the bowl with a rubber spatula halfway through. The mixture should become shiny, thick, fluffy, and hold stiff peaks when ready.
- Transfer to Pan: Quickly pour the marshmallow mixture into the prepared 8x8 pan. Use a rubber spatula or offset spatula to spread the mixture evenly into all corners and edges.
- Set in Refrigerator: Place the pan in the refrigerator and let the marshmallows cool and set for 1 hour.
- Cut and Coat: Once set, turn the marshmallow slab out onto a cutting board lightly dusted with the reserved powdered sugar and tapioca mixture. Cut into squares of your preferred size and coat each piece with the reserved mixture. Enjoy immediately or store for later use.
Notes
- Use pea protein powder with at least 90% protein isolate for best texture.
- Agar powder must be powder form, not flakes, to properly gel the mixture.
- Ensure the sugar syrup temperature reaches between 225-227°F for perfect consistency.
- Use a splatter shield or towel to protect yourself from hot syrup while mixing.
- Store marshmallows in an airtight container at room temperature or in the refrigerator.
- This recipe is naturally vegan and free from gelatin and eggs.
- Coating the pan and marshmallows thoroughly prevents sticking and adds a subtle sweetness.


Leave a Reply